SSH attacks are quite common if you are running SSH on Port 22. Most automated robots try to login as root with various brute force and dictionary combinations to get access to your server. If you have weak root password then chances are there that your server could be compromised. Further these robots put a lot of load on your server with thousands of retries to break in to your system.
How do i know that my server is being attacked?
Just check the logs of your server
nano /var/log/secure
nano /var/log/messages
There you will see logs of thousands or hundreds of repeated number of attempts from different IPs attempting to breakin to your server with different dictionary/brute force password combinations.You could be getting hundreds of automated attempts every minute that could slow down your server.
The simplest way secure your SSH is to run SSH on the different port other than default port 22. The hardening of SSH can be acheived by the following simple steps:
Initial Steps
Before you harden the SSH, first make sure you create a user name and password. If you are running cpanel, then you might want to add the username to cpanel wheel group.
To adduser and make the member of cpanel group
adduser <username> -G wheel
To set the password for the user
passwd <username>
Once the user has been created and added to Wheel group, edit the ssh configuration file /etc/ssh/sshd_conf
Step1: Change the default port 22 to any port number, say 2199 and set the protocol to just Protocol 2 which is a more secure protocol
nano /etc/ssh/sshd_config
# /etc/ssh/sshd_conf
Port 2199
Protocol 2
#ListenAddress 0.0.0.0
#ListenAddress ::
Step2: Disable root login
Locate the line # PermitRootLogin yes in the configuration file and change it to no
PermitRootLogin no
once you save this configuration and restart your SSH you will not be able to login as root and will be able to login only at Port 2129.
/etc/init.d/sshd restart
// to restart the SSH server
Step 3: Testing the SSH
To test whether the settings with SSH, open putty and enter the <IP-Address> and the port 2129 to login. Now login as <username> which you created previously with the password. Once you have successfully logged in, then su to root to do root tasks
> su root
Be careful that you dont forget or lose both the passwords as otherwise you will not be able to login with SSH.
Using the SSH with public key authentication is one of the best proven method to safeguard your SSH server. All you need to do is put the private key in your putty (ssh client) and the public key in your server
PrivateKey -> Stored in Client and used by Putty
PublicKey -> Stored in Remote Server ( in /home/<user>/.ssh/authorized_keys
file)
Tools Required
Putty
(SSH Login client)
PuttyGen (Putty Key Generator Tool to save Private key)
Step 1:
To enable the public key authentication you have to enable it in the SSH config
file /etc/ssh/sshd_config. Look for the following lines and
uncomment them
RSAAuthentication yes
PubkeyAuthentication yes
AuthorizedKeysFile .ssh/authorized_keys
Step 2:
Assuming that pbu is the username, we generate both public and private keys in the server.
[pbu@localhost ~]$ ssh-keygen -t dsa
Generating public/private dsa key pair.
Enter file in which to save the key (/home/pbu/.ssh/id_dsa):
Enter passphrase (empty for no passphrase):
Enter same passphrase again:
Your identification has been saved in /home/pbu/.ssh/id_dsa.
Your public key has been saved in /home/pbu/.ssh/id_dsa.pub.
The key fingerprint is:
a9:22:30:c4:ed:df:1c:e5:7b:3c:53:b4:82:aa:33:18 pbu@vps.localhost
As you carefully notice
id_dsa -> private key stored at /home/<username>/.ssh/
id_dsa.pub -> is the public key /home/<username>/.ssh/
Step 3: Downloading Private Key to Putty (SSH client)
In this step we are going copy the private key from server to our putty in the form of .ppk (putty private key file). Remember private key must be held in the client side and the public key in the server side (inside /home/<user>/.ssh/authorized_keys file)
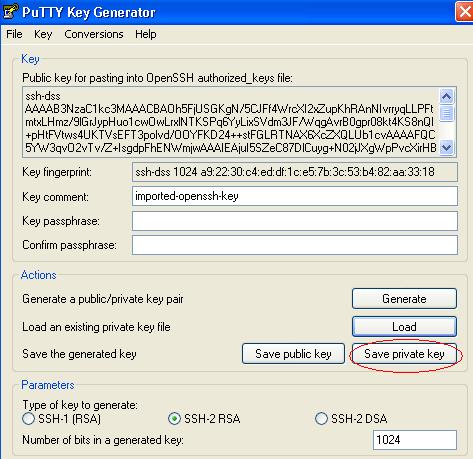
Open the file id_dsa and copy the contents of the file. Comeback to windows and paste into a notepad file (say privkey.txt). Make sure that there is no new line at the top or else you will get "invalid private key" from puttygen.
Start puttygen.exe > Load Existing Private Key > privkey.txt > Save Private Key
Save the private key as privkey.ppk
Step 4: Copying Public Key to Server
Nowwe need to a new file called authorized_keys inside .ssh folder within the users home directory. You should store the public key there. I am renaming the existing id_dsa.pub to authorized_keys as we wont be needing the ida_dsa.pub file. In linux moving a file is a shortcut for renaming a file.
cd /home/<user>/.ssh
mv ida_dsa.pub authorized_keys
Thats it we have finished copying both public and private keys.
You can also delete id_dsa and id_dsa.pub in your server
Thats it! All you need to do is just connect to server to see whether it works.
Start Putty > Enter IP > New Port, then load the private key SSH > Auth > Browse Private Key for Authentication
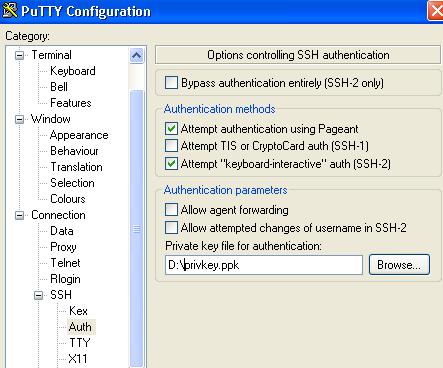
Then connect and once you enter the user name the putty would authenticate yourself with public key authentication.
Once you find public key authentication working properly you can safely disable the password authentication inside ssh configuration file.
Note: If you have used passphrase (other than empty) you might be asked for the passphrase you used while generating the keys
It could be caused by unwanted line breaks while copying the public key from puttygen to server. Try generating the public/private key from the server instead of generating the public/private key pair from puttygen.
Back to home